When to Create Tests
QA.tech works best when tests target features that already exist in your application. Since the AI agent crawls your site and builds a knowledge graph to design test cases, it relies on the feature being built and accessible.Testing Features That Don’t Exist Yet
If you ask the chat to create a test for something that isn’t built yet (e.g., “Go to the Admin page and add a user” when there’s no Admin page), the agent will either:- Spend time searching for a feature it can’t find
- Report that it doesn’t know how to complete the task
Recommended Workflow for New Features
Instead of creating tests before the feature exists, document what should be tested in your ticket or PR description:Add Acceptance Criteria to Your Ticket
When creating a Linear, Jira, or other ticket for a new feature, include acceptance criteria that describe what should be tested. For example:
- “User can navigate to Admin page and add a new user”
- “New user receives invitation email”
- “Admin can see the new user in the user list”
Include Test Requirements in PR Description
When you open the PR, include testing requirements in the description. The GitHub App agent reads your PR and uses this context to create appropriate tests.
Tests Are Created Automatically
When the PR is published and your preview environment is ready, our agent analyzes the PR changes and acceptance criteria, then creates and runs tests for the new functionality. See GitHub App for PR Reviews for details.
What Should Be a Test?
A good example of a test is something a user would like to do, or achieve. A user story or user journey should probably map 1:1 to a test case.Test Examples
- Log in with correct credentials
- Log in with incorrect credentials
- Create a new task
- Edit a task’s due date
Creating a Test
You can create test cases through the UI with AI-generated suggestions, or conversationally through the AI Chat Assistant.Create Tests via UI
Click the “Add Test Case” button to open the test creation modal with two options:

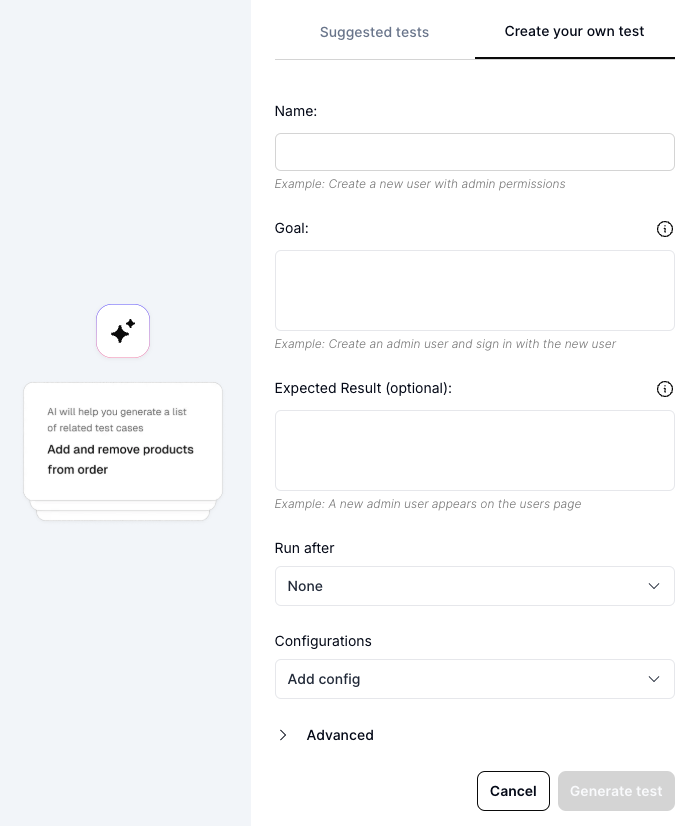
- Name: Clear, descriptive name (e.g., “Create admin user and verify access”)
- Goal: What the test should accomplish in natural language
- Expected Result (optional): What success looks like
- Dependencies: Configure test execution order (see Test Dependencies for WAIT_FOR and RESUME_FROM)
- Configurations: Add required data like credentials or test accounts
- Advanced: Agent selection and other settings
Choosing an AI Agent
When creating a test, you can select which AI agent executes it. Click the Advanced section in the test creation modal or test settings to see agent options.| Agent | Speed | Best For |
|---|---|---|
| Claude Haiku 4.5 (default) | Fastest | Most tests - recommended for day-to-day testing |
| Claude Sonnet 4.5 | Moderate | Complex scenarios requiring deeper reasoning |
Most users never need to change the default agent. QA.tech selects Haiku 4.5
because it offers the best balance of speed and capability for typical testing
workflows.
Create Tests via AI Chat Assistant
The AI Chat Assistant provides a conversational, exploratory approach to test creation: Natural conversation - Describe your testing needs in plain English. Ask for multiple tests, request specific coverage areas, or iterate on suggestions through back-and-forth conversation. Upload context - Drag and drop specification documents, design files, or requirements (PDFs, images, text files) directly into the chat. The AI uses this context to generate more accurate, relevant tests. Safe experimentation - Tests generated in chat aren’t committed to your project until you explicitly click “Add Selected Tests”. You can review, refine, or discard them without affecting your team. Uploaded files remain isolated to that chat conversation only.Review and Refine
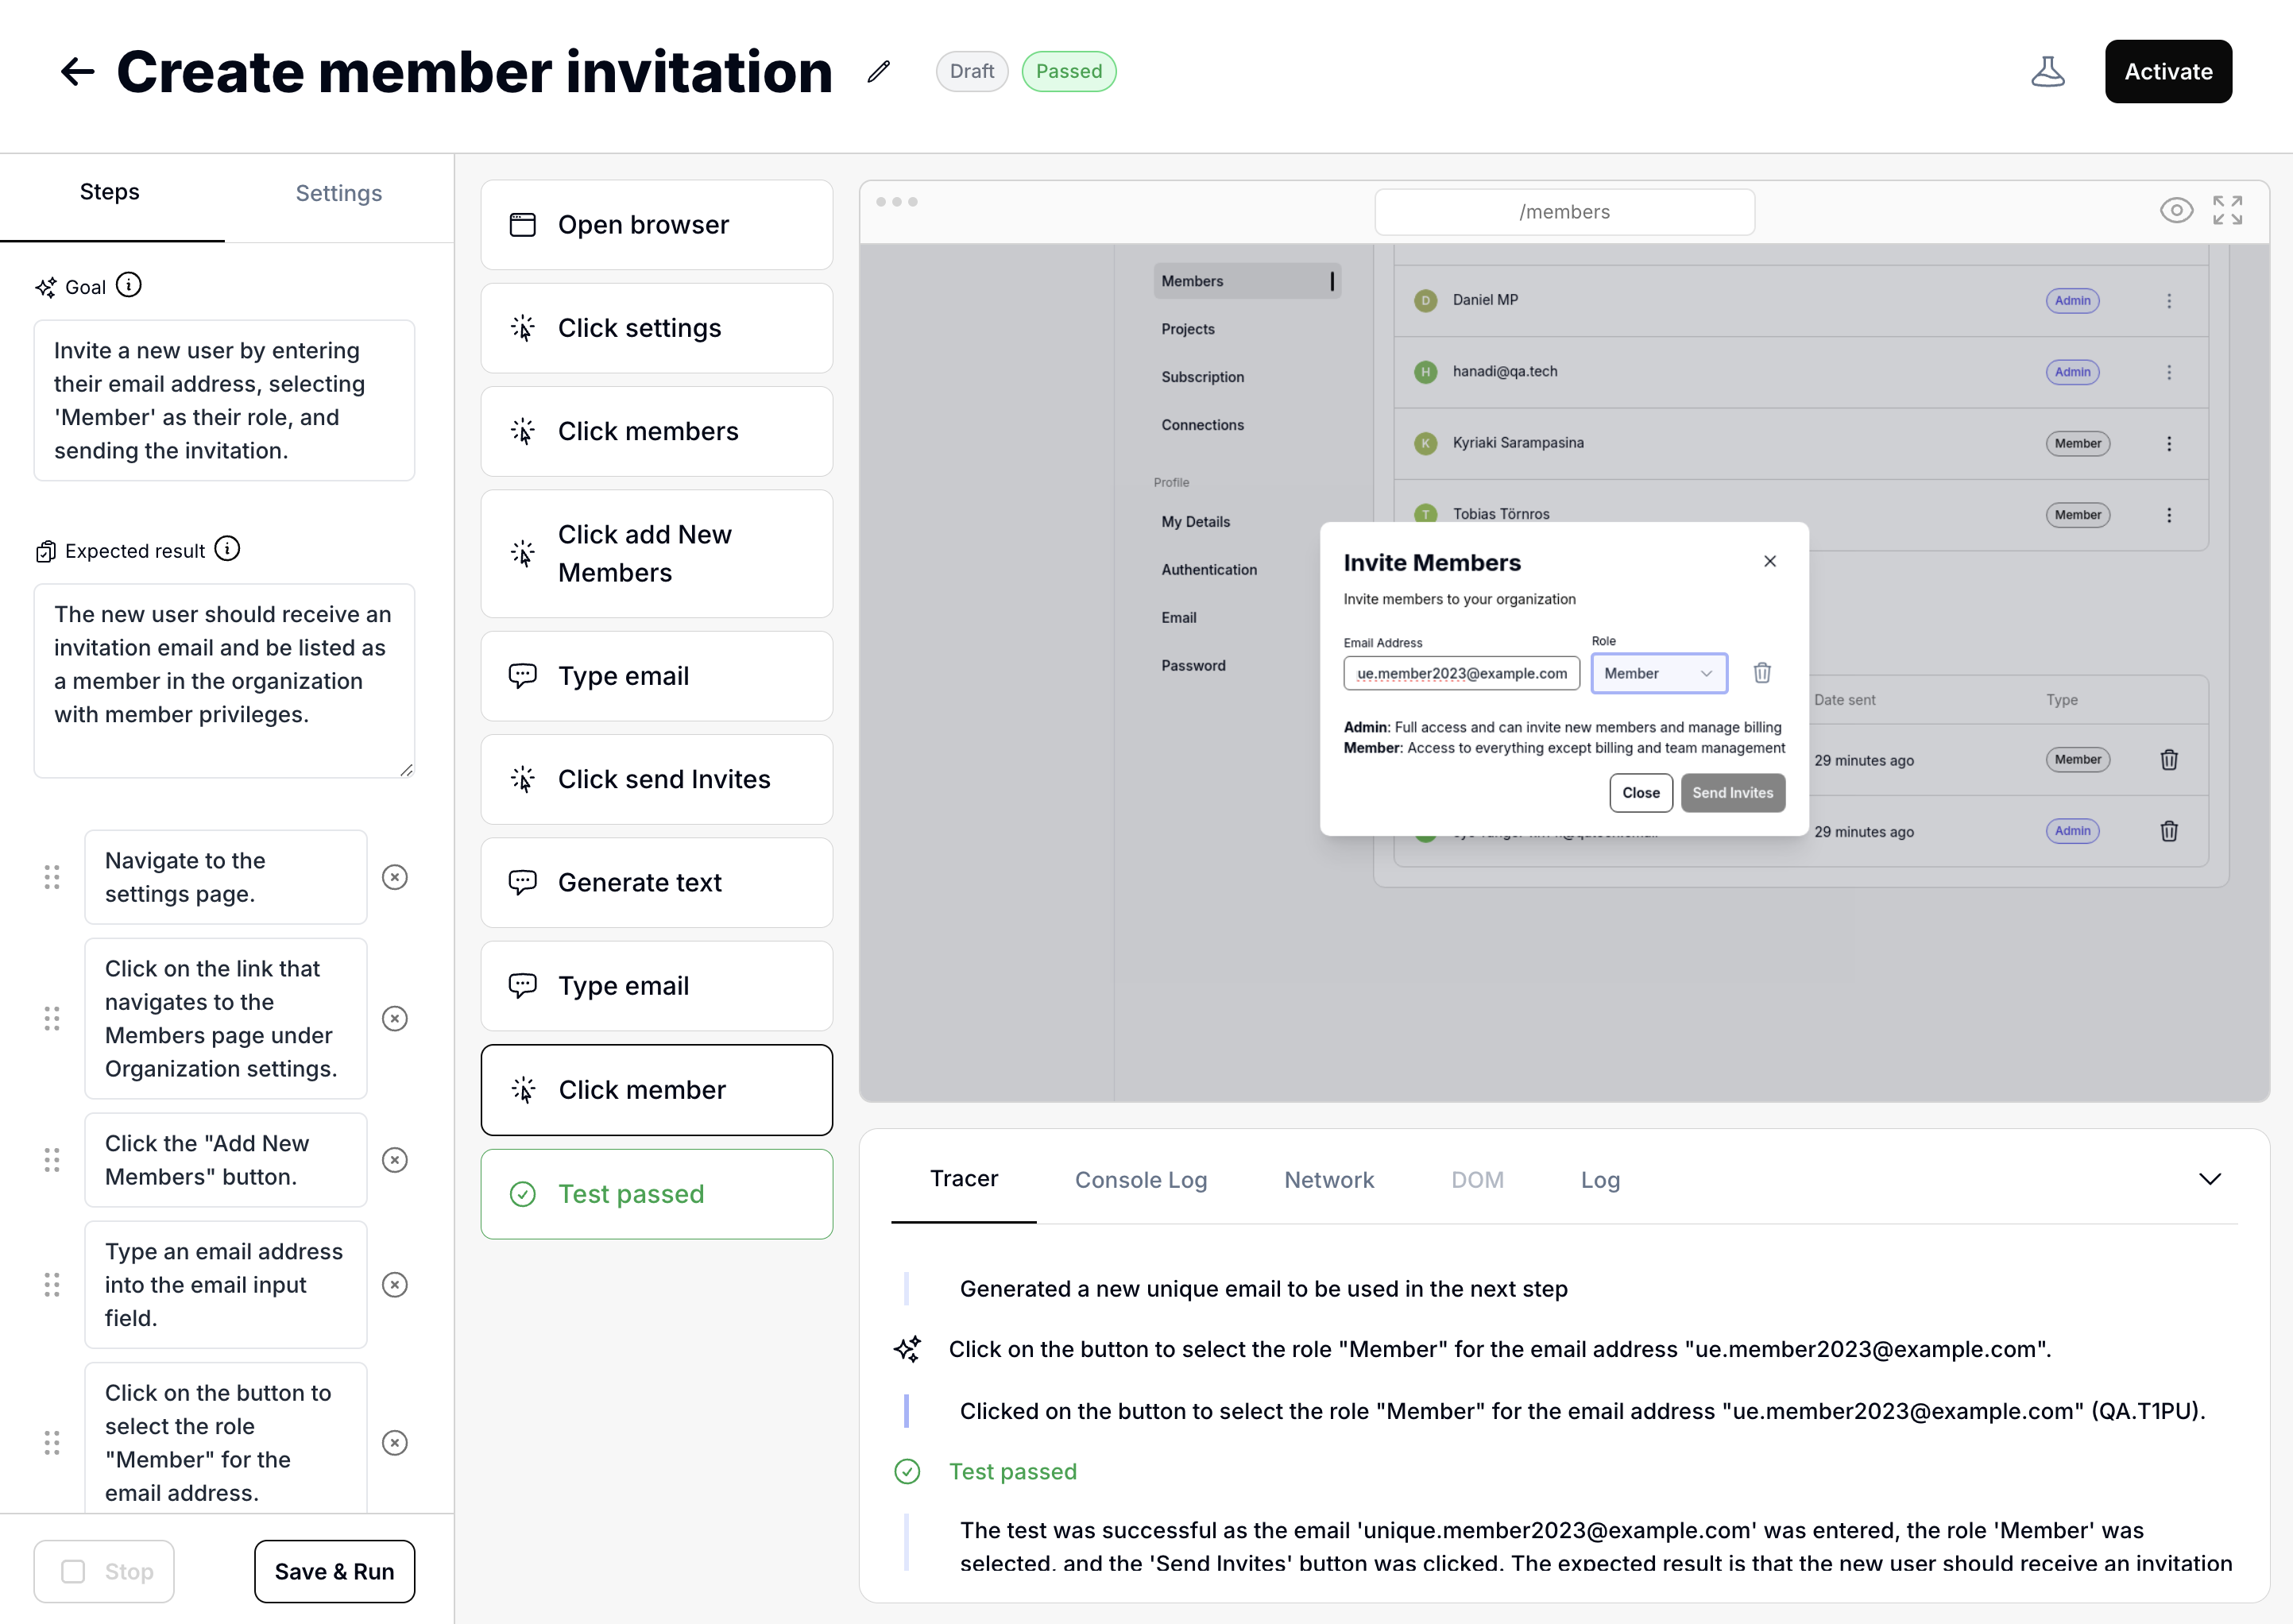
After creating a test, the AI agent automatically attempts to execute it and generate test steps. Click the review button to inspect the results:
Refine Tests via Chat
The fastest way to fix and improve tests: describe changes in the AI Chat Assistant, review the diff, and run immediately. Fix after failures - When a test fails, stay in chat and describe the fix. No context switching - see the failure, fix it, validate. Build iteratively - Create a rough test, watch it run, refine through conversation. The AI remembers what you both just saw. Bulk refinement - Describe what you want across your test suite and let the AI handle the details. It reads your tests, identifies which ones to change, and proposes edits for each.Example Prompts
| You say… | What happens |
|---|---|
| ”Change step 3 to wait for the spinner first” | AI proposes single step edit |
| ”Also verify the success message appears” | AI adds verification to current test |
| ”Make this resume from my Login test” | AI updates dependency |
| ”Add email verification to all checkout tests” | AI finds and edits multiple tests |
| ”Create tests for returns similar to checkout” | AI reads your tests, generates new ones |
Only for existing tests: Editing works on tests that have been created.
For suggestions you haven’t added yet, keep describing changes and the AI will
regenerate the suggestion.
Activating and Organizing Tests
After creating and reviewing your test, you’ll want to activate it and organize it within your project.Activate Your Test
Tests are created in draft mode so you can review and refine them before they run. When you’re ready, click the “Activate” button to enable the test and make it part of your active test suite.If your test has dependencies that are also in draft mode, QA.tech will prompt
you to activate them together to ensure proper execution order.
Organize with Scenarios
On the Test Cases page, you can drag and drop tests to organize them into Scenario groups. Scenarios help you:- Keep related tests together (e.g., “Checkout Flow”, “User Management”)
- Create logical test groupings for better organization
- Get a clear overview during test execution
- Set up test dependencies within related workflows
Writing Effective Tests
Writing a Good Goal
The goal is the main objective of the test. The agent uses this to build steps and adapt when your application changes. Focus on describing what to do, not what to validate (use expected result for that). Good goal examples:- Search for ‘Chair’, navigate to a product and add it to the cart
- Invite a new member with Admin role to the project
- Open the customer support chat and send a message
- Action-oriented - Start with verbs like “Create”, “Search”, “Navigate”, “Add”
- Specific - Include exact details (product name, user role, button labels)
- Focused - Describe actions to take, not validation criteria
Writing a Good Expected Result
The expected result defines what the agent should verify at the end of the test. Describe what should be visible or observable when the test completes successfully. Good expected result examples:- The page should contain a user avatar
- A success message appears and the user is redirected to the product list
- The user receives an email with a password reset link
- Observable - Focus on things that can be verified visually or through system responses
- Specific - Include exact elements, messages, or states to check
- Outcome-focused - Describe the end state, not how to get there
Performance tip: Agent Cache is enabled by
default, speeding up test execution by reusing AI reasoning from previous
successful runs. Consider disabling cache when debugging flaky tests or
testing new features where you want fresh AI analysis.
Testing Email Flows
When writing tests that involve emails (like password resets or notifications), follow these best practices to ensure the agent can find the correct email:- Specify the Recipient: Always mention the target email address in your test goal or step (e.g., “Wait for the welcome email sent to
user@example.com”). - Use Descriptive Queries: Describe the email content clearly (e.g., “Find the email with subject ‘Reset Password’”).
- Mind the Time Window: Remember that tests can only see emails received after the test started.
- If Test A triggers an email and finishes, Test B cannot see that email if it starts afterwards.
- Solution: Combine the trigger and verification into one test, or use dependencies where the second test triggers the email resend.